Setup Wizard: Difference between revisions
Bcarmichael (talk | contribs) |
Bcarmichael (talk | contribs) |
||
| Line 13: | Line 13: | ||
The next screen simply welcomes you to the Setup Wizard. Click next to continue. | The next screen simply welcomes you to the Setup Wizard. Click next to continue. | ||
[[Image:setup_wizard_step0.png| | [[Image:setup_wizard_step0.png|500px|center|Setup Wizard - Welcome]] | ||
=== Setup Wizard - Step 1 - Configure the Server === | === Setup Wizard - Step 1 - Configure the Server === | ||
Revision as of 16:43, 24 September 2018
The Setup Wizard will open automatically when Untangle first boots. If you do not have a keyboard/mouse/video connected to the Untangle server, the Setup Wizard can be reached by plugging into a DHCP-configured laptop into the internal interface opening a browser to http://192.168.2.1/.
Once installed, the setup wizard can be repeated at any time and can be found in the NG Firewall GUI at Config > System > Support > Setup Wizard.
Language selection
Before you begin the setup wizard, select your preferred language.
Setup Wizard - Welcome
The next screen simply welcomes you to the Setup Wizard. Click next to continue.
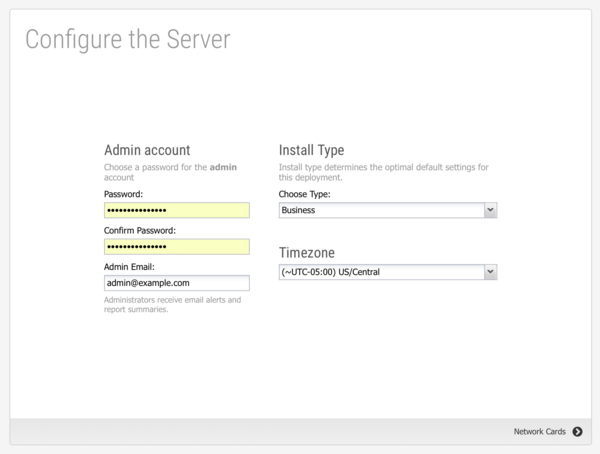
Setup Wizard - Step 1 - Configure the Server
The first step has you set a password for the administrator account for Untangle and select a timezone.
Setup Wizard - Step 2 - Identify Network Cards
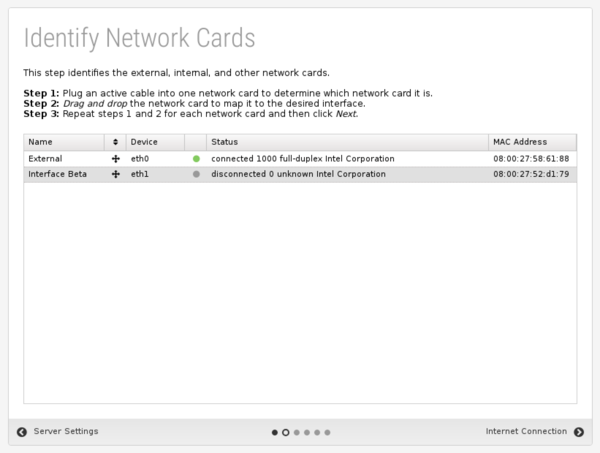
The second step shows you the network cards. If this is a appliance from Untangle you can simply continue to the next step. If this is a third party appliance or a custom server, you should verify that the physical network cards are mapped to the correct (desired) interface.
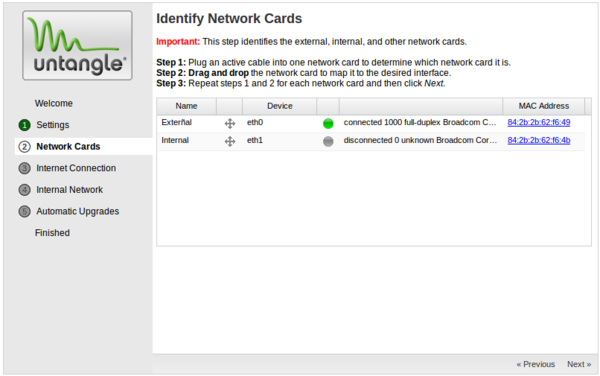
To determine that the physical network cards are mapped to the correct interface plug in one at a time and verify that it is in the correct position. For example, unplug all network cables from Untangle. Plug in the cable into the desired "External" physical network card. If the green light on "External" lights up then that physical network card is mapped to the correct interface. If the green light on another interface lights up, you should drag that device to the External interface using the arrow icon next to the device name. Alternative you can select the drop down on the device and choose the desired device. Once that is complete unplug all network cables and complete the process for all other interfaces.
Setup Wizard - Step 3 - Configure The Internet Connection
The third step configures your External (WAN) interface.
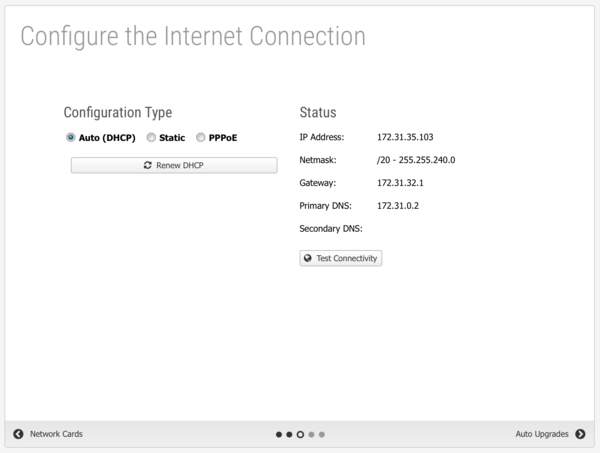
The default is Auto (DHCP) and the current automatically assigned address will be displayed if an address was successfully acquired. Auto (DHCP) is typical in home and small networks where ISPs provide no static addresses and DHCP is used to hand out addresses. Also, if Untangle is installed behind another device serving DHCP, this option can be used.
For larger networks Static configuration is preferred. In a static configuration, complete the Address Netmask Gateway and Primary DNS using values provided by your ISP.
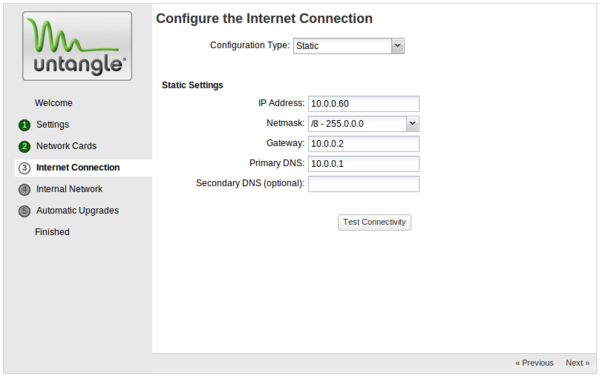
However, If Untangle is being installed behind another firewall doing NAT the ISPs public address should not be used. It is common to use the gateway's IP plus one. For example if if 192.168.1.1 is the gateway for Untangle you can use 192.168.1.2 for the address for Untangle and 192.168.1.1 as the gateway.
Some ISP's provide connectivity via PPPoE. In this case, select PPPoE and provide the PPPoE username and password.
Note: If the network settings are blank, and there is no network connectivity, ensure that a network cable is connecting your modem to your Untangle appliance. Sometimes it is necessary to restart the modem so that the network settings are visible.
Setup Wizard - Step 4 - Internal Network Interface
The fourth step will configure your "Internal" interface (and DHCP server and NAT configuration.) There are two choices.
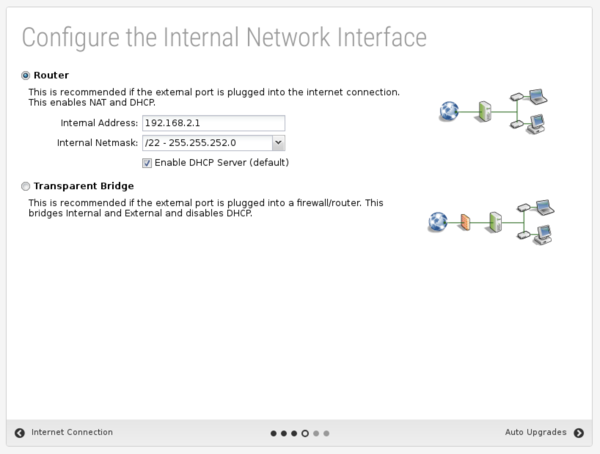
You can configure the internal interface with private static IP address (ie 192.168.2.1) and enable DHCP serving and NAT (Network Address Translation) so all internal machines will have private addresses and share one public IP. This is commonly referred to as Router mode.
You can also configure the internal interface to be bridged to the external. In this mode the internal interface does not have its own address and is simply shares the External's address. This is commonly referred to as Transparent Bridge mode.
Router
In Router mode, Untangle will be the edge device on your network and serve as a router and firewall. In this case you'll need to set up your External and Internal interfaces correctly for traffic to flow, which should have been done while installing.
Transparent Bridge
In Transparent Bridge mode, Untangle is installed behind an existing firewall and sits between your existing firewall and main switch. When in Bridge mode Untangle is transparent, meaning you won't need to change the default gateway of the computers on your network or the routes on your firewall - just put the Untangle between your firewall and main switch and that's it. You do not change the configuration of existing clients or the existing firewall!
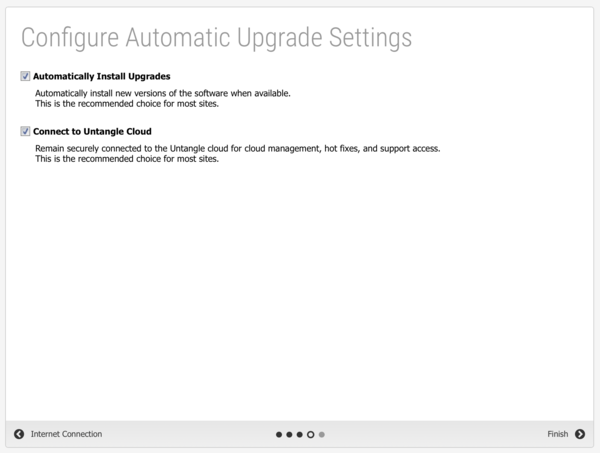
Setup Wizard - Step 5 - Configure Automatic Upgrade Settings
In the fifth step Automatic Upgrades are configured. If Automatic Upgrades is enabled will automatically check for new versions and upgrade automatically between 1am and 2am every morning.
Setup Wizard - Finished
That's it!

The next step is installing the desired applications and possibly further tuning the configuration of your Untangle server, then actually dropping Untangle into the network if it is not already in place.
Remember, the setup wizard can be repeated at any time. In Config > System > Support, click Setup Wizard.