Configuring NG Firewall for AWS using routed subnets
Overview
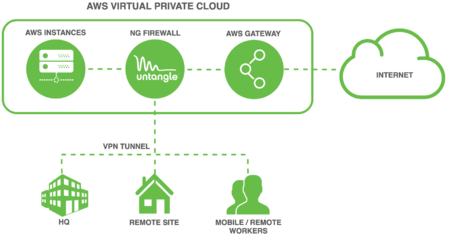
Untangle NG Firewall deployment in AWS can secure Internet access for other AWS instances. This scenario is useful if you have for example Amazon Workspaces and you need to apply Intrusion Prevention, Content Filtering, Bandwidth Control, and other next generation firewall capabilities to those instances. This type of deployment requires advanced Virtual Private Cloud (VPC) configuration to establish an internal subnet for AWS instances that routes through NG Firewall.

Before you begin
- Follow the steps outlined in Deploying NG Firewall in AWS.
- Review VPCs and Subnets in the AWS documentation.
Step 1. Configure a Security Group
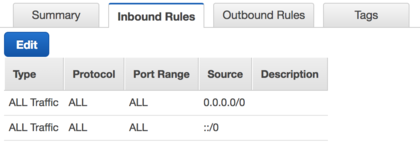
AWS instances and network interfaces inherit traffic rules defined by security groups. The security group assigned to your NG Firewall instance and instances on the private network behind NG Firewall should have an open policy to avoid conflicts. Confirm that the security group designated for your instances has rules to permit all incoming and outgoing traffic.
- In the AWS Management Console go to your VPC configuration from the Services menu.

Security group with permissive inbound rule - Click Security Groups.
- Select the default security group or a custom security group you designate for instances belonging to your internal subnet.
- In the Inbound Rules tab, click Edit.
- Add or confirm a rule allowing all traffic for all protocols where the source is 0.0.0.0/0.
- Confirm this same policy in the Outbound Rules tab.
Security group
Create one that authorizes all traffic: NGFW is by default locked down to only allow HTTPS and SSH when it is initialized. Services → VPCs → Security → Security Groups
- If you wish, you can later restrict more ports in that security group, after you're done configuring NGFW.
- Make sure to authorize traffic from your local machine/network for access.
- Create and select the “Save” button
Subnets
Create 2 subnets, one for the external NGFW interface and the other for the internal one. Make sure the subnets are in the same VPC and within the same availability zone. Navigate to Services → VPCs → Subnets. In this example, the VPC Network we are using is: 172.31.0.0/16
Create the External Subnet:
- Set the Name Tag: e.g. Untangle - Public
- Set the availability zone: e.g. us-east-1a
- Set network address: e.g. 172.31.0.0/20
- Select “Yes Create” button
Create the Internal Subnet:
- Set the Name Tag: e.g. Untangle - Private
- Set the availability zone: e.g. us-east-1a
- Set network address: e.g. 172.31.32.0/20
- Select “Yes Create” button
Network interfaces
You will need to create two network interfaces. Create these interfaces prior to launching the Untangle AMI.
Create the External Interface:
- Description: e.g eth0 - UT Public
- Subnet - select the external subnet you created: e.g. subnet-cda5bea8 us-east-1a | Untangle - Public
- Security group - select the security group you created: e.g. sg-811264f0 - Untangle - Untangle
- Select the “Yes Create” button
Create the Internal Interface:
- Description: e.g eth0 - UT Private
- Subnet - select the external subnet you created: e.g. subnet-cda5bea8 us-east-1a | Untangle - Public
- Security group - select the security group you created: e.g. sg-811264f0 - Untangle - Untangle
- Select the “Yes Create” button
Once you’ve saved the private network, you’ll need to disable the Source/Dest Check - this is so Untangle can NAT.
- Select the Internal interface you created:
- Then select the “Action” button and Select Change Source/Desc Check
- Set the Source/dest check to “Disabled”
- Select the “Save” button
Create and add Public IP to External Network Interface
- Select the “Allocate new Address” button and Navigate to Services → EC2 → ElasticIPs
- Select the “Allocate” button:
- Select the “Close” button
- Select the “Actions” button
- Select “Associate Address” from the “Actions” button menu
- Select the “Network Interfaces” radio button from Resource Type
- Select the Public Network Interface you created: e.g eni-f360b9e4 eth0
- Select the “Associate” button
- Public IP Address is associated with the Public Interface
Routes
Create a new route table and add a default route using the internal network interface you’ve created:
Navigate to Services → VPC → Route Tables
Select “Create Route Table”
- Set a Name Tag for the Route: e.g. Untangle - Private
- Select the VPC the Untangle is in: e.g. vpc-79ceo5f0
- Add the default route and attach it to the internal network interface:
- Select the route table you just created
- Select the Routes tab and then the “Edit” button
- Destination: 0.0.0.0/0
- Target - select the internal Network Interface you created: e.g. eni-f360b9e4
- Select the “Save” button.
- Next, select the Subnet Associations tab and select the “Edit” button:
- Select the internal subnet
- The select the “Save” button:
Create Internet Gateway
The VPC must have an Internet Gateway. Most VPC will already have one pre-configured. If one does not exist, create one:
- Navigate to Services → VPC → Internet Gateway
- Select “Create Internet Gateway” button
- Enter a Name tag: e.g. VPI -IGW
- Select the “Save” button
Launch the Untangle - AMI
- Navigate to Services → EC2 → Select the Launch Instance Button
- Select AWS Marketplace and search for Untangle
- Select the “Launch” button for the Untangle NG Firewall
- Select the Instance type
- Select the “Next: Configure Instance Details"
- Subnets: Select the External Subnet you created:
- Select the “Add Device” Button
- Set eth1 to the Internal Subnet you created
- Select the “Next: Add Storage” Button
- Select the “Next: Add Tags” Button:
- Tags - You can add tags to help you identify the AMI / Resources
- Select the “Next: Configure Security Group” button:
- Configure Security Group:
- Choose the “Select existing Security Group” radio button
- Choose the Security group you configured:
- Select the “Review and Launch” button:
- Subnets: Select the External Subnet you created:
- Review your configuration - Make any adjustments if needed:
- Select the “Launch” button:
- Key Pair
- Select an existing key pair or create new one
- Select “Launch Instance” button
Check your Untangle Instance
- Navigate to Services → EC2 →
- Verify the Instance is running
- Make note of the Public IP
- Login to Untangle
- Point your browser at: https://<publicIP> e.g.: https://34.22.127.3
- Configure Untangle
Your browser may show a message indicating that connecting to your new server needs caution. This message is simply telling you that there isn't yet a server certificate in place because the server is not yet configured. Once the Untangle setup process is complete, this warning will no longer occur when you direct a browser to your new server.