Configuring NG Firewall for AWS using routed subnets
Overview
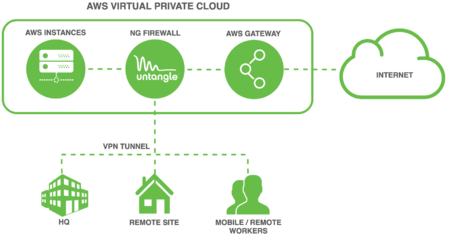
Untangle NG Firewall deployment in AWS can secure Internet access for other AWS instances. This scenario is useful if you have for example Amazon Workspaces and you need to apply Intrusion Prevention, Content Filtering, Bandwidth Control, and other next generation firewall capabilities to those instances. This type of deployment requires advanced Virtual Private Cloud (VPC) configuration to establish an internal subnet for AWS instances that routes through NG Firewall.
Before you begin
- Follow the steps outlined in Deploying NG Firewall in AWS.
- Review VPCs and Subnets in the AWS documentation.
Step 1. Configure a Security Group
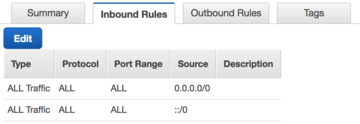
AWS instances and network interfaces inherit traffic rules defined by security groups. The security group assigned to your NG Firewall instance and instances on the private network behind NG Firewall should have an open policy to avoid conflicts. Confirm that the security group designated for your instances has rules to permit all incoming and outgoing traffic.
- In the AWS Management Console go to your VPC configuration from the Services menu.
- Click Security Groups.
- Select the default security group or a custom security group you designate for instances belonging to your internal subnet.
- In the Inbound Rules tab, click Edit.
- Add or confirm a rule allowing all traffic for all protocols where the source is 0.0.0.0/0.
- Confirm this same policy in the Outbound Rules tab.
Step 2. Configure a Network ACL

Each subnet inherits the policies of network ACLs. Confirm that the network ACL designated for your internal subnet contain rules to permit all incoming and outgoing traffic.
- In the AWS Management Console go to your VPC configuration from the Services menu.
- Click Network ACLs.
- Select the default network ACL or a custom network ACL if designated for your internal subnet.
- In the Inbound Rules tab, click Edit.
- Add or confirm a rule allowing all traffic for all protocols where the source is 0.0.0.0/0.
- Confirm this same policy in the Outbound Rules tab.
Step 3. Create an internal subnet
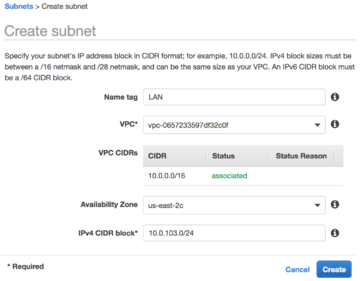
To route traffic for AWS instances through NG Firewall you must designate an internal [subnet]. You assign this subnet to network interfaces belonging to your AWS instances and NG Firewall.
- In the [AWS Management Console] go to your VPC configuration from the Services menu.
- Click Subnets.
- Click Create Subnet.
- Select the VPC containing your NG Firewall and AWS instances.
- Select an availability zone.
- Assign an IPv4 block that is within the scope of your VPC.
- Click Create to confirm the new subnet.
Step 4. Create a network interface
Network interfaces in AWS attach to instances and facilitate network access to the VPC. The NG Firewall and instances protected by the firewall must be assigned to the internal subnet you created in the previous step. If you created your instances and network interfaces prior to creating the internal subnet, you can create new network interfaces to associate your instances to the internal subnet.
- In the AWS Management Console go to your EC2 configuration from the Services menu.
- Click Network Interfaces.
- Click Create Network Interface.
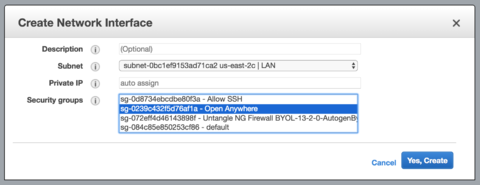
AWS network interface configuration wizard - Select the internal subnet you created in the previous step.
- Keep Private IP as auto assign.
- Select the permissive security group you created in the first step.
- Click Yes, Create.
Step 5. Attach the network interface
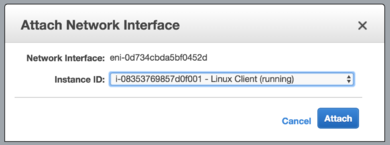
After you create a network interface you must attach it to an instance.
- In the Network Interfaces screen select an available interface that belongs to the internal subnet.
- In the Actions menu choose Attach.
- Select the Instance ID of your NG Firewall
- Repeat the steps for creating and attaching network interfaces for all instances that you intend to place on the internal subnet.
Step 6. Disable source and destination check
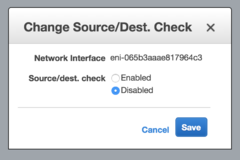
By default, the AWS VPC configuration prevents NAT routing. You must override this behavior by disabling source and destination check for the internal network interface of NG Firewall.
- In the network interfaces screen select the internal network interface attached to NG Firewall.
- In the Actions menu choose Change Source/Dest. Check.
- Set the value to Disabled.
- Click Save.
Step 7. Create a route table
To direct traffic through your NG Firewall instance you must create a route table with NG Firewall as a gateway and associate it with the internal subnet.
- In the AWS Management Console go to your VPC configuration from the Services menu.
- Click Route Table.
- Click Create Route Table.
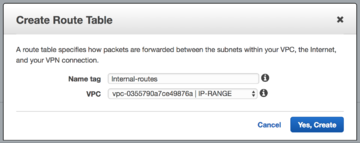
Creating a route table in AWS - Assign the route table a Name Tag and the VPC containing your NG Firewall and associated instances.
- Click Yes, Create.
Step 8. Add a default route
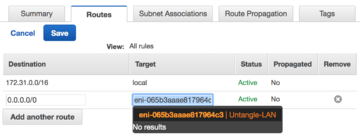
Before adding the default route, refer to the network interfaces screen and capture the Network Interface ID of the internal interface attached to your NG Firewall instance.
- In the Route Table screen, select the route table you created in the previous step.
- Select the Routes tab.
- Click Edit.
- Click Add another route.
- In the Destination field, enter 0.0.0.0/0.
- In the Target field, enter the Network Interface ID of the internal network interface attached to your NG Firewall instance.
- Click Save.
Step 9. Associate the route table
To associate the route table to your internal subnet:
- Select the new route table entry and click Subnet Associations from the configuration panel.
- Click Edit and associate the route table to your internal subnet.
- Click Save.
Check your Untangle Instance
- Navigate to Services → EC2 →
- Verify the Instance is running
- Make note of the Public IP
- Login to Untangle
- Point your browser at: https://<publicIP> e.g.: https://34.22.127.3
- Configure Untangle
Your browser may show a message indicating that connecting to your new server needs caution. This message is simply telling you that there isn't yet a server certificate in place because the server is not yet configured. Once the Untangle setup process is complete, this warning will no longer occur when you direct a browser to your new server.